
Is GMail spying on your email?

On 6th January 2026 the Daily Mail reported:

In October 2025 Google quietly activated a feature that means you’ve been secretly opted in to a feature that allows the tech giant to access all your private emails.

Why did they do this?

To allow Google to scan their messages and attachments to help train its AI models like Gemini.

Read the full article here.

How do you stop them spying on your data?

In order to stop your data from being used you need to turn off Googles Smart Features in 2 places, as follows:

Online

If you use Gmail through a desktop or laptop, you have to open the ‘See all settings’ tab and choose to turn off the option ‘Turn on smart features in Gmail, Chat, and Meet’ in the section labeled as Smart features.

Gmail users who do not wish to have their private messages scanned by Google's AI learning models will need to turn off two featured immediately

Then you have to open the ‘Manage Workspace smart feature settings’ located right below the Smart features and opt out of the permissions there before saving your choices.

On a mobile device

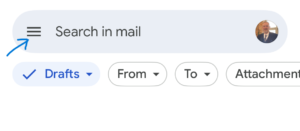
If you access your messages through a smartphone, tap the menu icon, which looks like three lines at the top left of the screen.

Gmail Menu

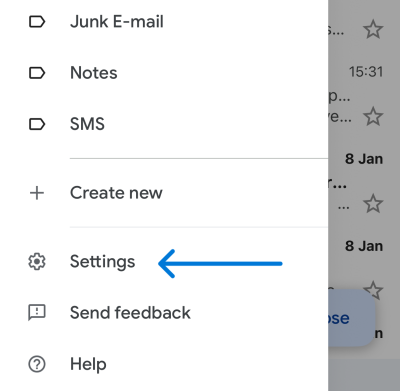
Next, scroll down to the bottom and select ‘Settings,’ 

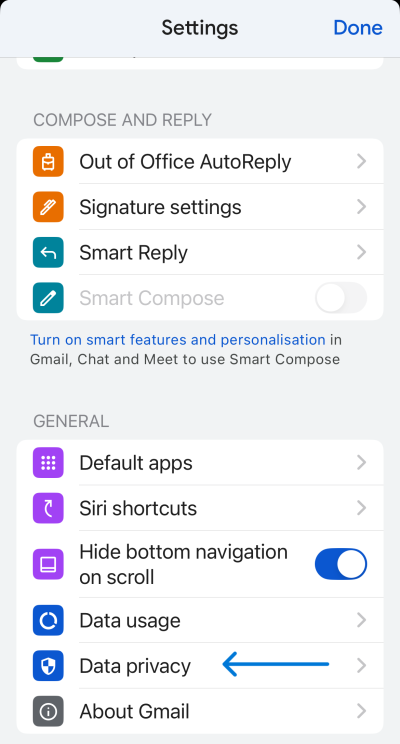
GMail Settings

Again scroll all the way to the bottom and then tap ‘Data privacy.’

Gmail Data Privacy

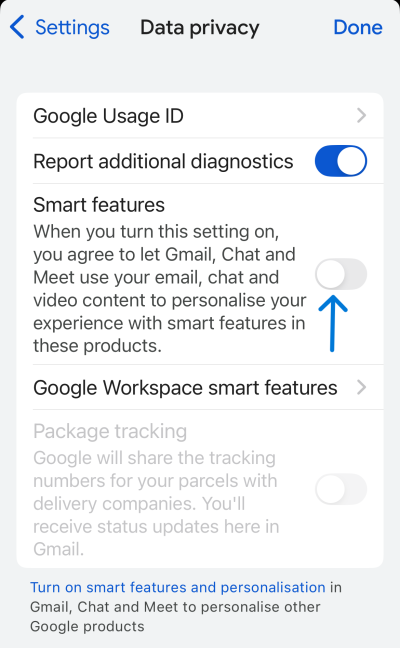
Toggle off ‘Smart features and personalization’

GMail Smart Features

Then tap into ‘Google Workspace smart feature settings’ and turn off the options for Workspace and other Google products.

HOW TO OPEN A SHARED MAILBOX ON A MAC USING OUTLOOK

  • From within Outlook for Mac on the Tools menu, click Accounts
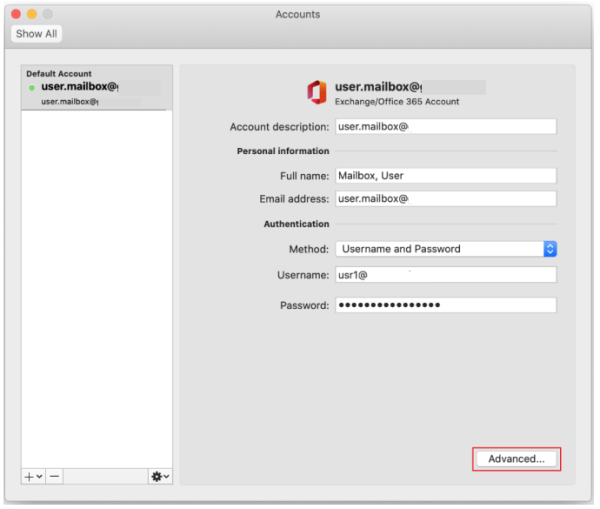
  • On the left under accounts click the account that you want to add the shared mailbox to (ie your own account/email address)
user mailbox
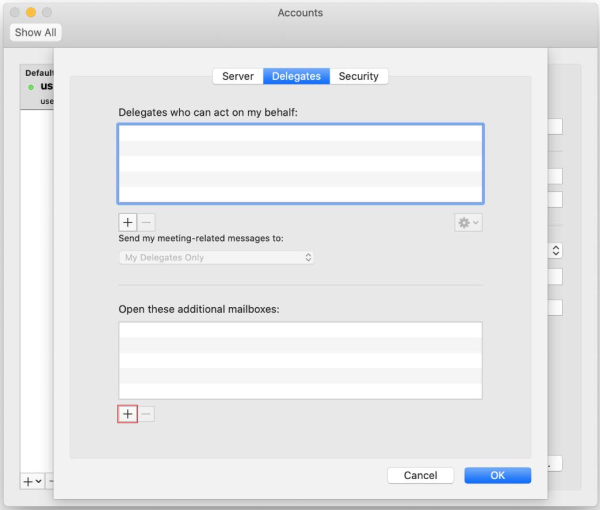
  • Click Advanced bottom right, and then click Delegates tab at the top middle.
delegates tab
  • Under Open these additional mailboxes (the bottom window) click Add  Add.
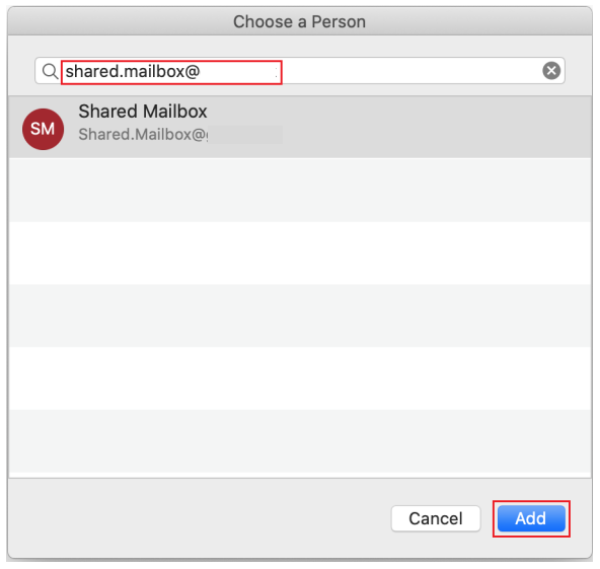
  • Type the name of the person that you want to add as a delegate.
shared mailbox
  • Click the delegate’s name in the search results list, and then click Add.
  • Click OK, close the Accounts window and the shared mailbox should appear on your folder list. Some times you have to close and re-open Outlook.

What is SPF and why do we need it?

SPF is basically your email domain’s guest list — and the mail servers at the door are checking it like nightclub security.

What is SPF?

SPF (Sender Policy Framework) is a record you publish in your DNS that says:

“Here are the servers that are allowed to send email on behalf of my domain. Anyone else? Kick them out.”

It’s literally a list of approved senders.

So if someone tries to send an email pretending to be you — but from some random server — the receiving system checks your SPF record and goes:

“You’re not on the list. you’re not coming in.”

Why we need SPF

1. It stops spoofing (or at least makes it much harder)

Without SPF, scammers can use your domain to blast out phishing emails.
With SPF, their fake sender server gets flagged as unauthorised.

2. It helps your real emails get delivered

Mail providers love SPF.
If they see you’ve got a proper SPF record, they’re more likely to treat your messages as legit and less likely to put them into spam.

3. It’s required for full authentication

SPF + DKIM + DMARC is the holy trinity of “please don’t send my emails to spam.”

DMARC in particular uses SPF results to make decisions, so without SPF your DMARC setup is basically missing a leg.

4. It helps you keep track of who’s sending what

Whenever you add a new email system — e.g. Microsoft 365, a marketing platform, a ticketing system — you add it to your SPF record.
This stops surprises and keeps your domain tidy.


The takeaway


SPF tells the world which machines are allowed to send mail as you.
Without it, your domain is free real estate for spammers, and your delivery rates suffer.

SPF is only one element of protecting your domain, the others are:

You need all three setup and configured correctly for full authentication of your domain.

SPF + DKIM + DMARC are all required for FULL AUTHENTICATION of your email system.

What is DKIM and why do we need it?

DKIM is basically your email’s “tamper-proof seal.”

What DKIM is (in plain English)

When your system sends an email, it stamps it with a special digital signature — kind of like sealing a letter with a unique wax stamp that only you can make.

When the receiving mail server gets the message, it checks your public “stamp” (stored in DNS) to make sure:

  1. The email really came from you, and

  2. Nobody messed with it on the way.

If the stamp doesn’t match, the receiving system goes, “Nope, someone’s been fiddling with this,” and treats it as dodgy.

Why we need DKIM

Because without it…

  • Anyone can fake the “From” address.

  • Messages can be altered in transit and nobody would know.

  • Modern mail systems (Google, Microsoft, etc.) will start looking at your domain like it has a shady past.

  • DMARC, which is the upper-most level protection, relies on DKIM to do half its job.

The simple bottom line

DKIM is the proof that your emails are genuinely yours and untouched.
Without it, your emails look like they could be from literally anyone, and mail providers don’t trust that.


It’s one of the main ingredients that keeps your messages out of spam and keeps impersonators from running wild with your domain.

DKIM is only one element of protecting your domain, the others are:

You need all three setup and configured correctly for full authentication of your domain.

SPF + DKIM + DMARC are all required for FULL AUTHENTICATION of your email system.

What is DMARC and why do we need it?

What is DMARC?

DMARC is basically the bouncer for your company’s email.

When your organisation sends an email, you want the receiver to know it’s really from you and not from some scammer pretending to be you.

DMARC is a rulebook you publish that tells other mail servers:

  1. How to check if an email claiming to be from you is legit
    (It uses two older checks behind the scenes: SPF and DKIM.)

  2. What to do if an email fails those checks

    • Let it through anyway – Not good you don’t want emails not from you arriving in your clients Inbox. Known as p=none

    • Put it in spam – Also not good, yes better than going direct into a clients Inbox but if they check their spam regularly they will still get the email that’s not from you. Known as p=quarantine

    • Or deny/block it – If an email is not genuinely from you then it needs to be denied/blocked so your clients don’t get it. Known as p=reject

  3. Where to send reports about who’s trying to spoof your domain
    So you can see if someone is out there impersonating your brand.

Think of it as:
“Here are my security guards (SPF/DKIM). If someone fails the ID check, here’s how I want you to handle them, and by the way, please send me a daily report.”

So DMARC is a simple but mighty way to stop people sending dodgy emails pretending to be you.

Why do we need it?

Because without DMARC, your email domain is basically a house with the front door wide open and a sign saying, “Please don’t rob me.”

Here’s the easy answer:

1. Stops scammers pretending to be you

Anyone can forge the “From” address on an email. Without DMARC, there’s nothing stopping someone sending fake emails that look like they came from your domain.
DMARC tells receiving servers how to handle fakes, so most of them get blocked or dumped into spam/junk.

If someone sent a fake Invoice to your clients, or even worse they intercepted a genuine Invoice you sent and changed the bank details on that invoice and then sent it on to your client this could result in your client paying someone else. This is not something you want to happen.

2. Protects your brand

If scammers send emails pretending to be you, your company looks unprofessional or — worse — untrustworthy. DMARC helps you avoid that PR nightmare.

3. Improves your email deliverability

Ironically, not having DMARC can make even your real emails look suspicious.
Having DMARC set up correctly makes inbox providers like Microsoft, Google, and everyone else more confident you’re genuine — so your emails land in inboxes instead of spam folders or bouncing back.

4. Gives visibility into what’s happening with your domain

DMARC’s reports show you:

  • who’s sending email from your domain,

  • who’s trying to,

  • and whether your own systems are set up correctly.

You can’t fix what you can’t see.

5. It’s becoming a requirement

Google, Yahoo and Microsoft already expect DMARC from bulk senders. Others will be following soon.

Soon “no DMARC” will be the email equivalent of “no seatbelt”.


In short:
DMARC keeps the bad guys out, keeps your real mail flowing, and stops your domain from becoming a playground for scammers.

DMARC is only one element of protecting your domain, the others are:

You need all three setup and configured correctly for full authentication of your domain.

SPF + DKIM + DMARC are all required for FULL AUTHENTICATION of your email system.

How resolve “the app you are trying to install is not a Microsoft-verified app windows”

Try going to Settings > Apps > Advanced app settings > Choose where to get apps > Select “Anywhere”

Understanding SharePoint storage

Understanding SharePoint storage

Jump to: freeing up space, buying more storage.


SharePoint is a web-based platform that allows you to create, share, and manage content, documents, and information. If you’re responsible for your business data, chances are you manage SharePoint sites. But what happens when SharePoint gets full? Let’s look at the fundamentals of SharePoint storage, and a few ways of managing your SharePoint storage allowance.

How much SharePoint storage do you get with Office 365?

Let’s cut to the chase; that’s why you’re here. To work out how much storage you get with Microsoft 365, use the following equation:

(number of 365 licenses x 10 GB) + 1 TB = total SharePoint storage allowance

Microsoft gives every tenant (i.e. your business) 1 TB of SharePoint storage as standard. On top of that, each 365 user license (such as 365 Business Basic, Standard or Premium) adds an additional 10 GB to the tenant’s SharePoint storage allowance.

Here’s an example: say you have 16 office-based users with 365 Business Standard, 10 remote users with 365 Business Basic, and 10 mailboxes using Exchange Online (plan 2), then your total SharePoint storage allowance would be 1,360 GB, or 1.36 TB.

There is no limit to how much extra storage you can buy for your tenant, but each SharePoint site can be up to 25 TB in size, and no more.

To see how much space your tenant has, and importantly, how much is available, head to your SharePoint Admin Centre. Select ‘Active sites’ in the left-side panel to view all of your SharePoint sites. In the top-right of this page, you will see your SharePoint allowance. Here’s ours in the image below. We have 502.87 GB available!
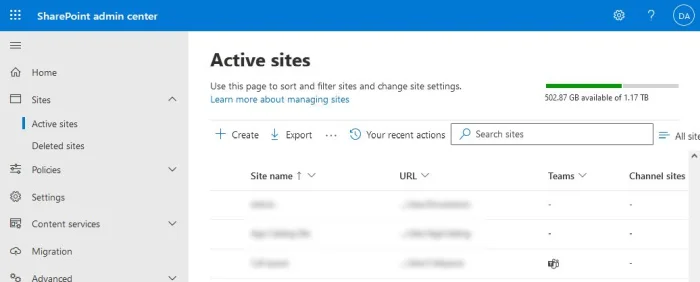
 

SharePoint active sites with storage allowance
The SharePoint active sites page, with storage allowance


Technical note: in SharePoint, like other cloud storage services, 1 TB (terabyte) is defined in the metric 1,000GB (gigabytes), not the binary 1,024 GB. If you don’t know what I’m talking about here, then please don’t worry about it! But if you’ve worked with memory and storage systems at a hardware level, you may be aware of the difference.

Other storage limits

There’re some other limitations to storage in SharePoint that you should be aware of:

  • File sizes in SharePoint are limited to 250 GB per file.
  • Each SharePoint library can hold no more than 30 million files and folders (items).
  • Each tenant can have no more than 2 million SharePoint sites.

Does SharePoint storage include OneDrive?

Individual users’ OneDrive areas do not count towards your SharePoint storage allowance. This is good news! Each user, as an individual, gets 1 TB of OneDrive storage space by default (this was increased from 500GB a few of years ago).

It’s possible for a 365 admin to increase this to 5 TB per user (depending on the user’s 365 license type), again without affecting your SharePoint storage. And here’s a little hint: if a user requires more than 5 TB of OneDrive space (rare, but not beyond the realms of possibility) then Microsoft itself can increase it up to 25 TB per user if you contact 365 Support and pester them.
 

Freeing up space

How do you see what’s taking up all the space in SharePoint? Before you go about buying more, you might want to have a clear-out. Here’s how.

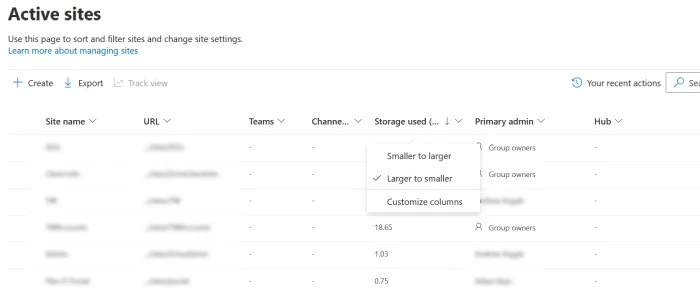
First we need to see which SharePoint sites are hogging your storage. Head to your SharePoint Admin Centre, and then Active Sites. You’ll be presented with a table of your sites; find the column called Storage Used and select the Larger to smaller option. This will sort your sites with the biggest offenders on top.


Active sites
A list of active sites in SharePoint, with the largest at the top


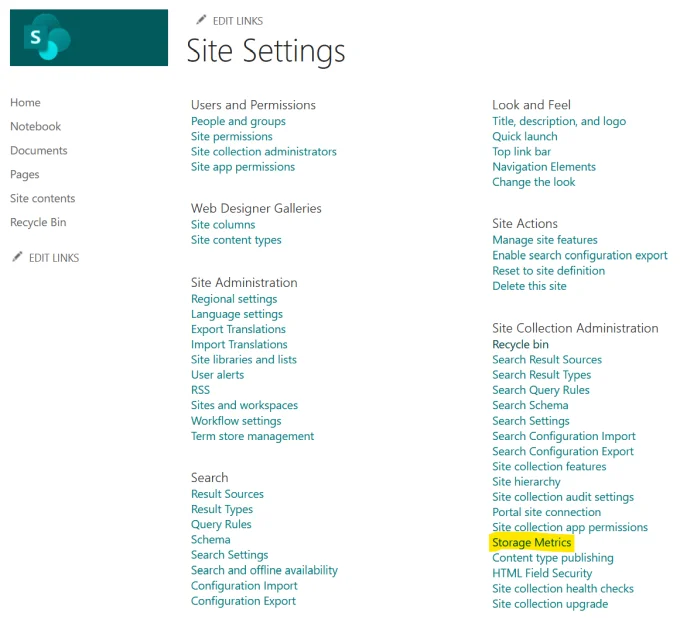
Head into one of the bigger sites by clicking the URL. Once inside, head to the Documents tab on the left, then the Settings cog in the top-right. From here, we select Site Contents, and then Site Settings. It’s a little convoluted, but you’ll now see a big list of settings. Find Storage Metrics, and click it.


Storage Metrics in Site Settings
Storage Metrics buried deep in the Site Settings page


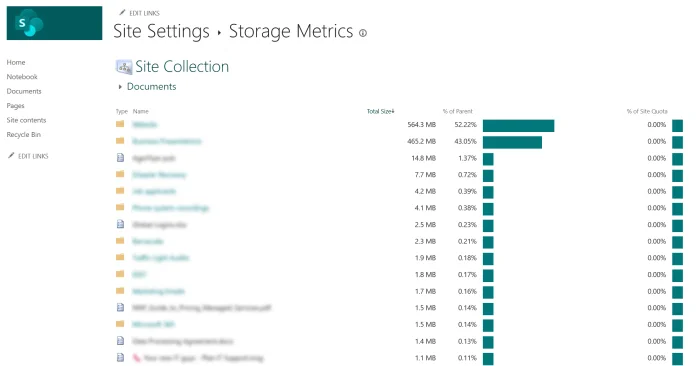
What you’re looking at now is a presentation of the data in your chosen SharePoint site, including the total size of files and folders in there. There is also, helpfully, a percentage bar-graph for each item, relative to the size of the library. This is a really useful, graphical way of seeing which files and folders are eating up all of your storage, and it will make spring-cleaning a doddle. Head into the biggest folders and see if you can delete anything.


Storage metrics page
A list of files and folders, with the storage hogs clearly presented


The SharePoint Recycle Bin

What this doesn’t include, however, is the Recycle Bin. And guess what? The Recycle Bin counts towards your SharePoint storage allowance.

There’s a first-stage and a second-stage Recycle Bin for each SharePoint site, which is great as a safety net for files you may need to scoop out of purgatory, but not so great for storage management. Much as emptying the Recycle Bin on your PC is an easy-win for freeing up disk space, the same is true in SharePoint, so let’s take a look there too.

You’ll see the Recycle Bin in the left-side panel of the site. Click into it, and if there’s anything in there that you think you can safely, permanently delete, then delete it. This will send it to the second-stage Recycle Bin, which can be found by scrolling all the way down to the bottom of the first-stage one. Head into there, and delete it again. Now it’s gone forever (so be warned).

Emptying the Recycle Bin can often take up to 24-hours to reflect in the Storage Used column of your SharePoint sites, so prepare for that.

A clear-out of your bigger SharePoint sites, and taking out the rubbish, can free up an awful lot of space. But what if that’s not enough? Let’s look at increasing your SharePoint storage allowance.


How do you increase your SharePoint storage?

If you reach the limit of your SharePoint storage allowance, all of your SharePoint sites and libraries will go into read-only mode. Disaster! So how do you increase it?

Microsoft allows you to buy extra SharePoint storage space outright, without having to increase the number of Microsoft 365 licenses you own. If you let a managed service provider like Skilled Tech handle your subscriptions, then it’s likely you will have an MCA billing account type, and the below steps will look a little different to you. However, if you manage your tenant yourself (and have a MOSA billing account type, i.e. you signed up to Microsoft 365 directly with a credit card), then here’s how to add extra storage to SharePoint.

Extra SharePoint storage costs £0.17 per GB per month, or £2.04 per GB per year (exc. VAT). The frequency of payment (annual or monthly) will depend on which existing subscription you attach the add-on to, more of which later.

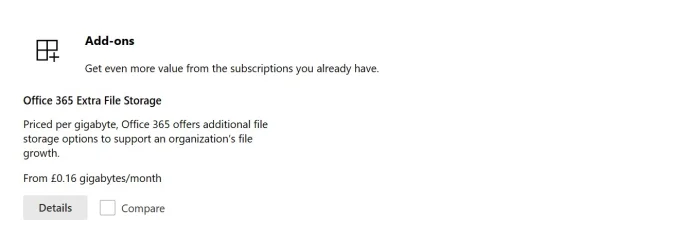
To add this to your tenant, head to the Admin Centre and then Billing > Marketplace. In the Add-Ons section at the bottom of this page, find Office 365 Extra File Storage, and hit the Details button.


Office 365 Extra File Storage
Look for Office 365 Extra File Storage in the Marketplace


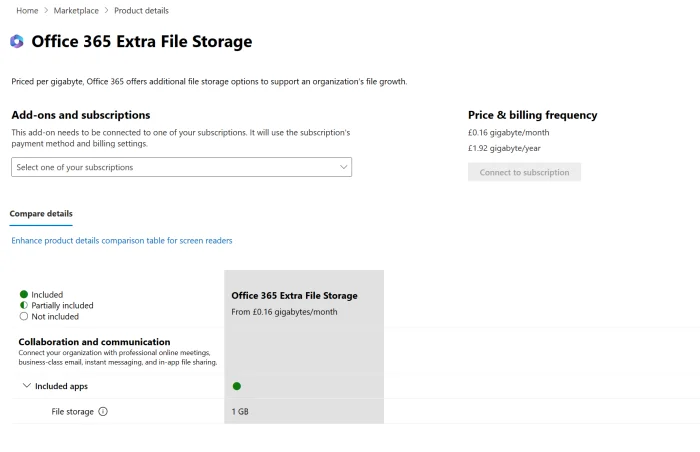
On the next step, you’ll select which subscription you want to align your payments with (you might have 365 Business Basic or Business Standard, for example. You can see these in the Select one of your subscriptions dropdown menu.). If your chosen subscription is paid monthly, you will also pay for SharePoint Storage monthly. If annual, then annual. Once you’re happy, click on Connect to subscription to complete the purchase. You can specify how much extra storage (in gigabytes) you’d like to buy here, or you can leave it set to the default 1 GB and increase / decrease later.


Office 365 Extra File Storage details page
The Office 365 Extra File Storage details page


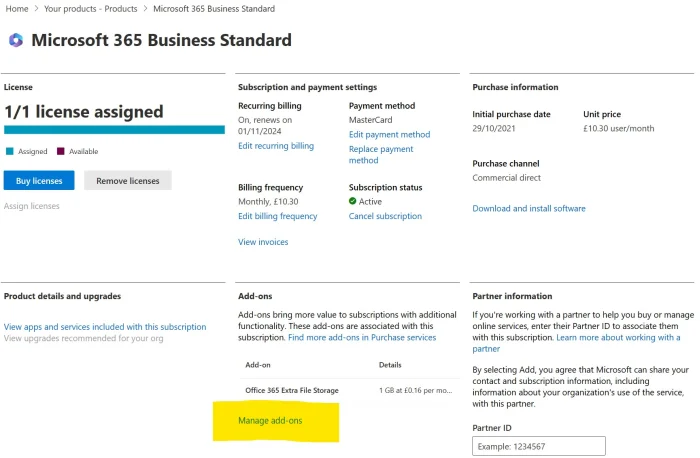
Once you have purchased the add-on, you can increase and decrease the amount of extra file storage on the fly. Back in the Admin Centre, choose Billing and then Your Products. Find the product that you aligned the add-on with. In my case, I have aligned it with my subscription to Microsoft 365 Business Standard.

The details page of your product subscription should look like the image below. Manage add-ons is highlighted in yellow. Click it.


Subscription details page
The Subscription details page, where you’ll find Manage add-ons (highlighted in yellow)


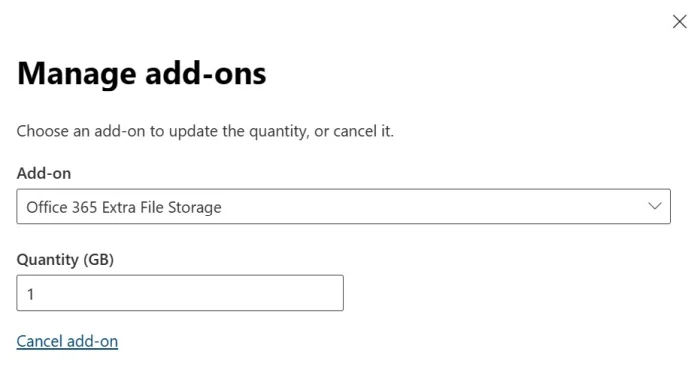
Here you’re presented with a fly-in that allows you to quickly and simply increase or decrease the amount of storage you wish to pay for. Even if you pay monthly or annually, changing this will apply immediately, and Microsoft will bill you pro-rata.


Office 365 Extra File Storage manage add-ons
Increasing or decreasing the amount of storage


You’re now a master at managing your SharePoint storage allowance. A clean-up like that described above should be a regular part of your data management. And getting rid of things you don’t need feels good, right? But if push comes to shove, you know you’re able to increase your allowance. You need never worry about your SharePoint sites going into read-only mode again.


7 key signs of a phishing email

I thought it important to share some key points on how to identify phishing emails. The criminals organising these attacks are getting better at designing what appear to be authentic emails.

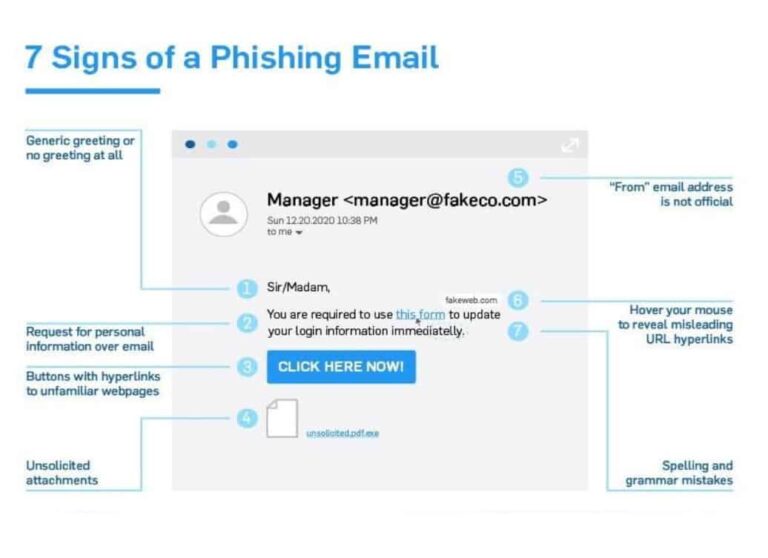
Below is a simple diagram that shows the 7 key signs of a bogus email. I always consider point 5 to be the key indicator, the area in the angle brackets is the tell-tale giveaway. The name to the left can easily be faked but the email address is trickier to fake. Look closely at the address to the right of the @ sign they are often from generic accounts with numbers, for example wayne@Amazon412.co.uk

Some more sophisticated attacks may substitute letters for numbers eg. wayne@sk1ll3dt3ch.co.uk

One very popular tactic that is on the increase is to impersonate the head of the company and send a high pressures time sensitive demand. They can go to the lengths of finding out if the boss is on holiday, knowing they would not want to be disturbed with a call to authenticate the email.

Never click on a link asking for your credentials, always go direct to the website from your internet browser.

If you ever have any doubts, please either forward the email to itsupport@skilledtech.co.uk, or even better send it as an attachment.

Simple Cybersecurity resolutions for the New Year

A New Year should mean a new you when it comes to ensuring you keep your devices secure.

Below are some simple cybersecurity resolutions for 2022.

Scams come in all shapes and sizes, but no matter how they’re dressed up, they always want something valuable, URGENTLY. So don’t be rushed—take your time in 2022.

Even if you’re expecting an email from someone urgently, make sure it is that person who has actually sent the email to you. Just because it has their name or email address on the email preview doesn’t mean it is actually from them. You can check if it is from who you think it is by simply looking at the top of the email and see if the email address is correct. For example if it looks something like this Heath Computers <scam@dodgyemail.co.uk> it will appear in the preview as from Heath Computers but it actually isn’t!

Never click on any links in an email even it looks genuine! Before you click on a link hover your mouse over the link and where it actually goes should pop up. Make sure where it actually goes and what you see in the email are the same and most importantly go to the correct website!

Strong passwords keep your data safe, so don’t let yourself choose feeble passwords in 2022, and if somebody shares a password with you, or asks for yours, just say “no.”

Never use the same password more than once, yes it can be a pain remembering different passwords all the time so maybe use a password manager such as LastPass or Dashlane they can also randomly generate passwords for you ensuring they are always different!

Don’t use significant dates, words or names for a password. If someone knows you well enough they will try things like your birthday, anniversary, place of birth or a combination of these to crack your password so avoid using them!

Use spurious characters like exclmation marks, @ and dollar signs etc in your password. N.B. the pound sign is not valid for passwords, but the dollar sign is.

Installing updates promptly is one of the best ways to be more cybersecure. Next time an app offers you an update, click “yes” instead of “no”, “cancel” or “remind me later”.

Don’t just do the Microsoft updates for your operating system, make sure you update all your applications as vulnerabilities in these programs can also lead to hackers gaining access to your device or data. You could consider using a software updater program for your operating system which will scan your device and inform you of out of date applications.

Antivirus software helps keep your device clear of unwanted viruses.

Always ensure you have some kind of antivirus software installed, even if it’s just Windows Defender!

However having it installed isn’t all you have to do.

You should regularly make sure the definitions and the program are up to date and you should also regularly run scans of your device.

Better still, if your AV program allows it, then schedule a scan at least once a month to ensure your device is clean and healthy!

As well as having antivirus software installed, you should also consider installing a good anti-malware program for additional protection that antivirus programs may not guard you against.

For more information see my What is Malware blog.

Good Cyber Security begins and ends with you!

Cyber security changes rapidly with new technology and solutions emerging all the time. To help combat it you should always think of the following:

  • If you’re not sure of an emails origins then delete it, don’t open any links in it!
  • Never give out your passwords
  • Don’t use significant dates, words or names for a password
  • Always make sure your software is up to date
  • Use Antivirus and Malware programs, and run regular scans

Email with Apple Mail

Learn how to configure Apple Mail for use with your Skilled Tech e-mail account using the POP3 Protocol.

Before you begin, you will need to have created an E-mail account in your Heath Computers package.

On your Apple Mac, click on the Apple Symbol top left of your screen then select System Preferences

The System Preferences window below will open.

Find and click on the Internet Accounts icon.

The Internet Accounts Window below will appear

Click the Add Other Account option on the right hand side.

Click the Mail Account option on the right hand side.

When the Add a Mail account window below appears, fill out your details and click Sign In.

When the Server Settings window below appears complete all the fields, ensuring you select POP from the Acount Type drop down box.
Enter the required information:

 
FieldData
E-mail AddressE-mail address
UsernameYour full E-mail address
PasswordThe password for your E-mail address
Account TypePOP
Incoming mail servermail.<yourdomain.co.uk>
Outgoing mail server (SMTP)mail.<yourdomain.co.uk>
  

Once you have completed all the fields, click Sign In.

The following are important:

  1. The Username has your full email address in it.
  2. Esure you select POP from the Acount Type drop down box.

You have now successfully setup your email account and should see your Email Account on the left hand side of the Internet Accounts Window, and the information below on the right hand side of the same window.

Close the Internet Accounts window.

You may now launch the Mail app from your dock at the bottom of the screen, or from within Applications in Finder.