
HOW TO OPEN A SHARED MAILBOX ON AN iPhone USING OUTLOOK APP

If your business uses a shared inbox — something like info@yourcompany.co.uk or sales@yourcompany.co.uk — you can access it from your iPhone through the Outlook app, without needing a separate login or password. Here’s how to set it up.

Before you start: you’ll need to already have permission to access the shared mailbox. If you’re not sure whether you do, your IT provider can check and grant access in a couple of minutes.

Step 1: Sign in to your own account first

Open the Outlook app and make sure you’re signed into your own work email account. This has to be done first, as the shared mailbox is added on top of your own account rather than as a standalone login.

Step 2: Open the account menu

Tap either the Home icon, your profile picture (or initials) in the top-left corner of your inbox. This opens a side menu showing all your accounts.

Choose Shared Mailbox Option

Step 3: Tap “Add Account”

Near the bottom of the side menu, tap the Microsoft 365 icon with the “+” (or the envelope “+” icon, depending on your setup) to add an account.

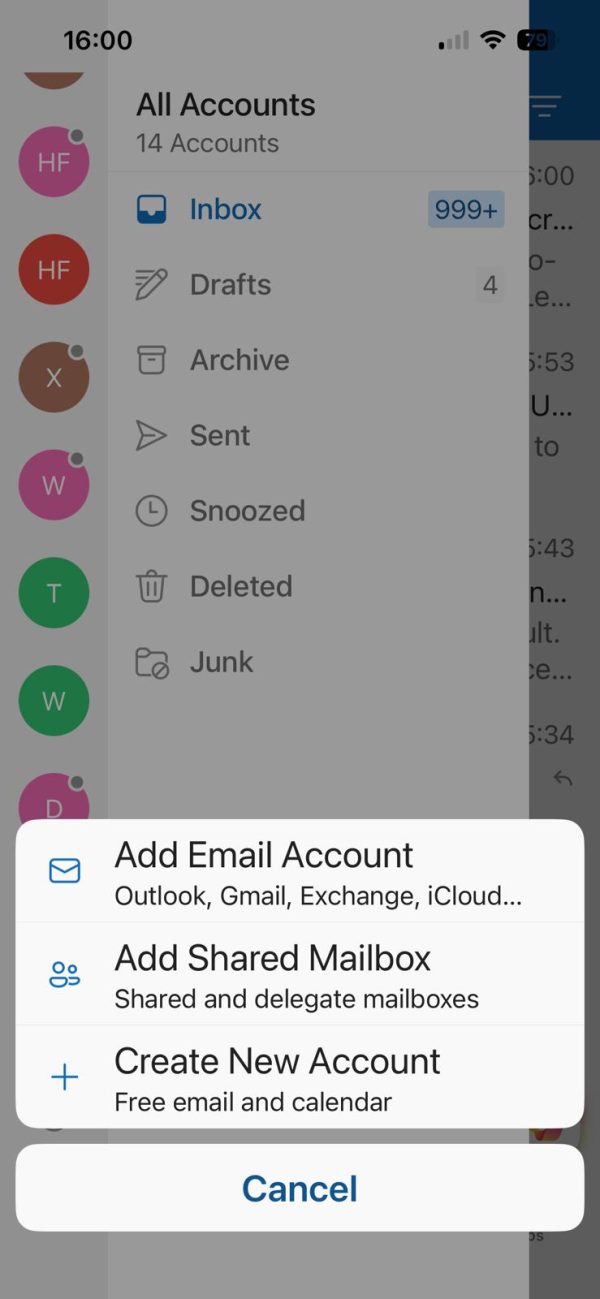
Step 4: Choose “Add Shared Mailbox”


A menu pops up with three options. Tap Add Shared Mailbox.

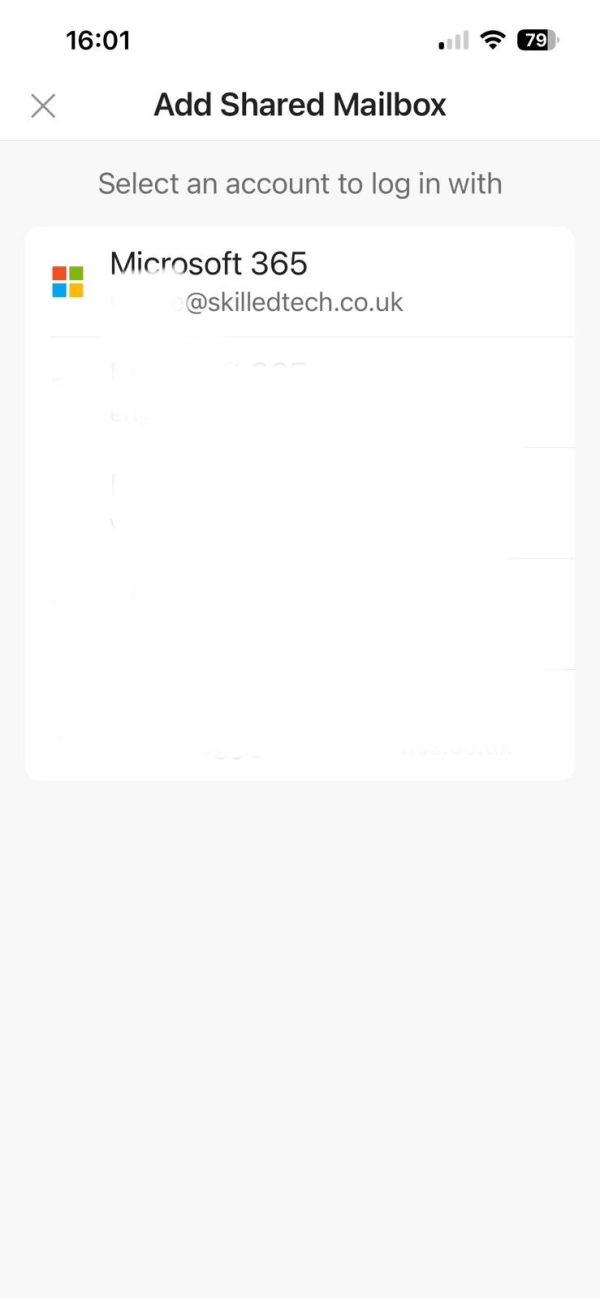
Step 5: Pick the right account (if you have more than one)


If you’ve only got one email account set up in Outlook, it’ll be used automatically. If you have more than one, you’ll be asked to select the account that has permission to access the shared mailbox.

Choose account

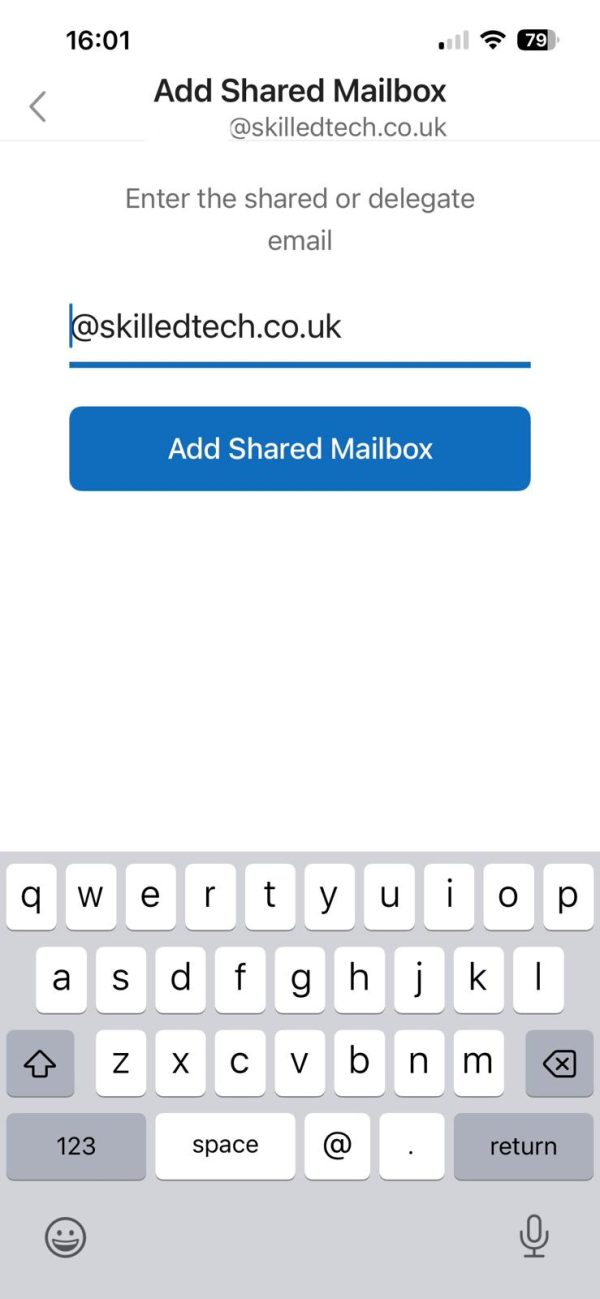
Step 6: Enter the shared mailbox address


Type in the shared mailbox’s email address (for example, info@yourcompany.co.uk) and tap Add Shared Mailbox. Outlook checks in the background that you’ve been given access — if you haven’t, you’ll see an error and it won’t be added.

Enter shared mailbox addess

Step 7: Find it in your account list

Open the side menu again and you’ll see the shared mailbox listed as a separate account underneath your own. Tap it any time you want to switch into it.

How to Get Your Windows PC Out of Tablet Mode

A simple, step-by-step guide for Windows 10 and Windows 11


Has your Windows desktop suddenly gone full-screen, with a bigger Start menu and chunky
icons everywhere? If so, your PC has probably switched into Tablet Mode — a feature
designed for touchscreen devices that can sometimes kick in by accident.
The good news is that it’s easy to fix. This guide will walk you through exactly how to turn it
off, whether you’re running Windows 10 or Windows 11.

NOTE Windows 10 and Windows 11 handle tablet mode differently. Jump to the section that
matches your version of Windows.

Windows 10: How to Turn Off Tablet Mode

Windows 10 has a dedicated Tablet Mode toggle. There are two ways to switch it off.

Method 1: Use the Action Centre (Quickest)

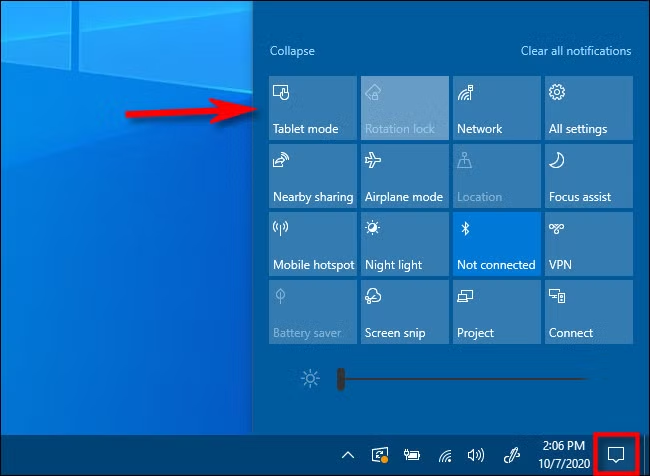
The Action Centre is the notification panel in the bottom-right corner of your screen — it looks
like a speech bubble icon. This is the fastest way to toggle Tablet Mode on or off.

1. Click the speech bubble icon in the bottom-right corner of the taskbar to open the Action Centre.
2. Look for a tile labelled “Tablet mode” in the quick settings area at the bottom.
3. Click it once to turn Tablet Mode off. The tile will go grey when it’s disabled.


TIP If you can’t see the Tablet mode tile, it may have been removed by Windows (Microsoft removed it from some updates). Use Method 2 below instead.

Method 2: Turn It Off in Settings

If the Action Centre tile isn’t available, or you’d prefer to stop Tablet Mode from switching on
automatically in future, go through Settings instead.

4. Press the Windows key + I on your keyboard to open Settings.
5. Click on “System”.

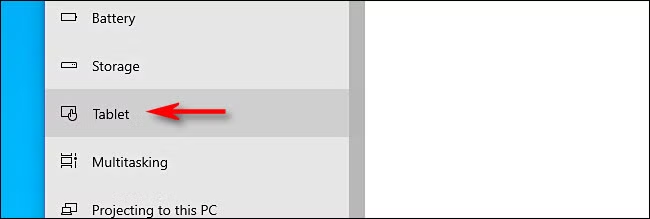
6. In the left-hand menu, click “Tablet”.
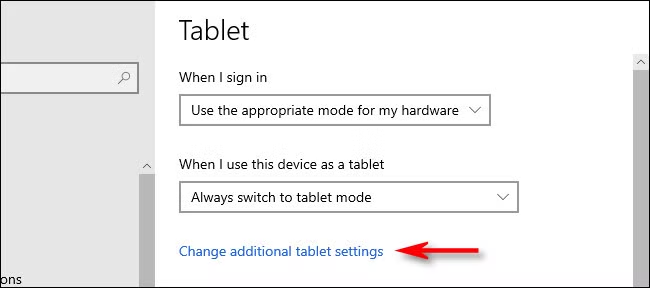
7. Click “Change additional tablet settings”.

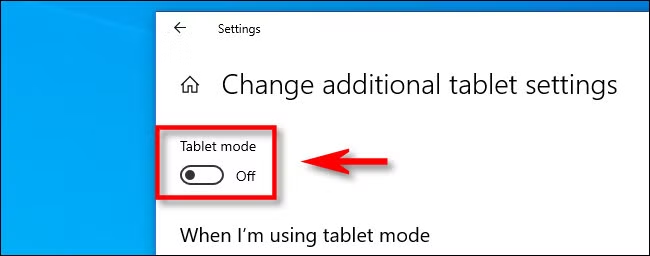
8. Find the “Tablet mode” toggle and switch it to Off.

Stop Windows 10 Switching Automatically

If you use a 2-in-1 laptop (one where you can detach or fold the keyboard), Windows 10 may switch into Tablet Mode automatically when you remove the keyboard. To stop this:

9. Go to Settings > System > Tablet.
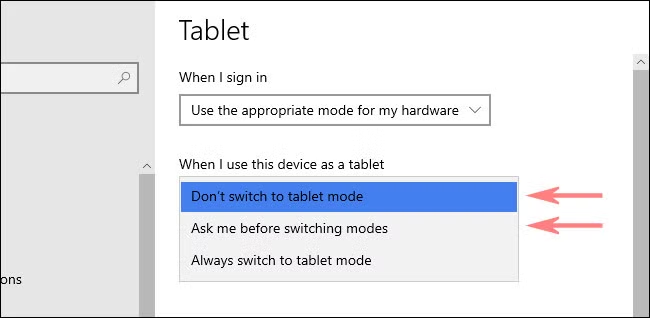
10. Open the dropdown menu under “When I sign in”.
11. Choose “Don’t switch to tablet mode”.

This will prevent Windows from switching modes automatically, even if you detach the keyboard.

Windows 11: How to Exit Tablet Mode

Windows 11 works differently to Windows 10. Microsoft removed the dedicated Tablet Mode
toggle for desktop and laptop computers. Instead, on touchscreen and 2-in-1 devices, the
tablet-style layout switches on and off automatically depending on whether a keyboard is
attached.

NOTE If your PC doesn’t have a touchscreen and you’re seeing a tablet-like layout, it’s more likely a display or settings issue rather than Tablet Mode itself.

If You Have a 2-in-1 or Detachable Keyboard

The quickest fix is simply to reattach or reconnect your keyboard. Windows 11 will
automatically switch back to desktop mode when it detects a keyboard is connected.

• Attach the keyboard firmly until it clicks into place.
• If using a Bluetooth keyboard, make sure it’s paired and switched on.
• Give it a few seconds — the screen should switch back automatically.

If You Have a Flip-Screen Laptop

If your laptop has a screen that folds all the way back (like a 360° hinge), rotating the screen back to normal laptop position will exit the tablet layout.

If Windows 11 is Stuck in Tablet Mode

If the above steps don’t work, or your PC seems stuck in a tablet-style layout, try these fixes in order:

12. Restart your PC. This resolves most small glitches and is always worth trying first.
13. Check your keyboard connection. If the keyboard isn’t detected properly, Windows won’t switch back. Try unplugging and re-plugging it, or reconnecting via Bluetooth.
14. Check your display settings. Go to Settings > System > Display and make sure the
screen orientation is set to Landscape, not Portrait.
15. Check for Windows Updates. Go to Settings > Windows Update and install any available updates. Microsoft sometimes fixes display and mode-switching bugs via updates.

16. Run a System File Check. If nothing else works, you may have a corrupted system file. Open the Start menu, search for Command Prompt, right-click it, and choose “Run as administrator”. Type sfc /scannow and press Enter. Windows will scan and repair any issues automatically

Quick Summary

Your Situation What to Do
Windows 10 — quick fix
Click the notification icon (bottom-right) and tap the Tablet mode tile
Windows 10 — via Settings
Settings > System > Tablet > Change additional tablet settings > toggle Off
Windows 11 — 2-in-1 or detachable
Reattach the keyboard and wait a few seconds
Windows 11 — flip-screen laptop
Rotate the screen back to normal laptop position
Windows 11 — stuck in tablet mode
Restart, check keyboard connection, check for Windows Updates

Still stuck?We’re here to help.

If none of the above steps have resolved the issue, it’s possible there’s an underlying hardware
or software fault. Get in touch with us at SkilledTech and we’ll get it sorted.

What Is BitLocker and Why Does It Matter for Your Business?

If you’ve ever been asked for a “BitLocker recovery key” when starting up your laptop, you’ve probably wondered what it is and why Windows is asking for it. In this post we’ll explain what BitLocker is, how it works, and — most importantly — where to find your recovery key before you need it.

What Is BitLocker?

BitLocker is a built-in encryption feature in Windows that protects the data on your hard drive or SSD. It comes included with Windows 11 Pro, and most business editions of Windows at no extra cost. Windows 11 Home has a cut down version of it called Device Encryption.

When BitLocker is switched on, everything stored on your drive is scrambled using strong encryption. Without the correct credentials or recovery key, the data is completely unreadable — even if someone removes the drive and connects it to another computer.

By default now in Windows 11 if your login for your PC is your email address (either personal or business) Bitlocker will be enabled automatically and you won’t be given the option to save the 48 character recovery key.

It is also important to note that if you change some hardware in your PC such as RAM this can trigger the Bitlocker Key being needed.

What Does BitLocker Actually Protect Against?

BitLocker is designed to protect your data in scenarios where someone gains physical access to your device. For example:

  • A laptop is lost or stolen
  • A device is taken for repair and the drive is removed
  • A second-hand laptop is sold without wiping the drive properly
  • A bag is left on a train or in a car

Without BitLocker, anyone who gets hold of your drive can plug it into another machine and read everything on it — documents, emails, passwords saved in browsers, client data, financial records. With BitLocker enabled, they get nothing but encrypted gibberish.

It’s one of the simplest and most effective ways to protect sensitive business data, and it’s already built into Windows — there’s no additional software to buy.

How Does BitLocker Work?

When you switch BitLocker on, Windows encrypts the entire drive using AES encryption (a military-grade standard). From that point on, every file written to the drive is automatically encrypted, and every file you open is automatically decrypted in the background. As a day-to-day user, you won’t notice any difference.

Most modern laptops use a chip called a TPM (Trusted Platform Module) to store the encryption keys securely. This means Windows can unlock the drive automatically at startup without asking you to enter anything — as long as the hardware hasn’t changed. The moment something unusual is detected (like the drive being moved to a different machine, or certain hardware changes), BitLocker kicks in and demands the recovery key before it will unlock the drive.

What Is the BitLocker Recovery Key?

The recovery key is a 48-digit number, split into eight groups of six digits, that acts as a master override for your encrypted drive. If BitLocker ever locks you out — whether due to a hardware change, a firmware update, or a fault — this key is the only way to get back in.

It looks like this (example only):

371483-417520-145574-412578-244156-625548-612315-341528

Without it, your data is inaccessible. Permanently. There is no back door, no manufacturer reset, no way around it. This is what makes BitLocker so effective at protecting data — and why keeping track of the recovery key is so important.

Where Is the Recovery Key Stored?

This depends on how BitLocker was set up on your device. Here are the most common places to look:

1. Your Microsoft Account (Most Common for Personal/Home Devices)

If the laptop was set up with a personal Microsoft account, the recovery key is almost certainly saved there automatically.

To find it:

  1. On any device, go to account.microsoft.com
  2. Sign in with the Microsoft account used on the laptop
  3. Click on Devices, then select the device
  4. Look for BitLocker data protection or Manage recovery keys

This is often a lifesaver — many people don’t even realise their key was saved here.

2. Azure Active Directory / Microsoft Entra ID (Business Devices)

If the laptop is joined to a business Microsoft 365 tenant, the recovery key is likely stored in Azure AD (now called Microsoft Entra ID).

Your IT administrator can find it by:

  1. Logging into the Microsoft Entra admin centre
  2. Going to Devices > All devices
  3. Finding the device and selecting BitLocker keys
3. Active Directory (On-Premise Business Networks)

If your business runs an on-premise Windows Server with Active Directory, and the device is domain-joined, the key may have been backed up there. Your IT team can retrieve it from the Active Directory Users and Computers console or via PowerShell.

4. A Printout or Saved File

When enabling BitLocker manually, Windows gives you the option to save the recovery key as a text file or print it. If this was done, check for a saved file or document — ideally stored somewhere other than the encrypted laptop itself.

5. IT Management Platform

If your device is managed by an IT support company using a Remote Monitoring and Management (RMM) tool or Microsoft Intune, your IT provider may have the recovery key on file.

What If I Can’t Find the Recovery Key?

If you genuinely cannot locate the recovery key and BitLocker has locked the drive, the data on that drive is not recoverable. This is by design — the encryption is that strong.

This is why we always recommend:

  • Making sure devices are set up with a Microsoft account so keys are backed up automatically
  • For business devices, ensuring they’re enrolled in Microsoft Intune or joined to Azure AD so IT can retrieve keys centrally
  • Keeping a secure record of recovery keys for any standalone devices

Should My Business Be Using BitLocker?

In short, yes. If your staff use laptops — especially if they work remotely, travel, or take devices off-site — BitLocker should be enabled on every machine. It costs nothing extra, has no impact on day-to-day use, and could be the difference between a minor inconvenience and a serious data breach if a device is ever lost or stolen.

If you’re not sure whether BitLocker is enabled on your business devices, or you’d like help setting it up and making sure recovery keys are properly stored, get in touch with us at SkilledTech. It’s a quick job and well worth doing.

SkilledTech Ltd provides IT support and managed services to small businesses across the UK. Contact us to find out more about Bitlocker and how we can help protect your business data.

Is GMail spying on your email?

On 6th January 2026 the Daily Mail reported:

In October 2025 Google quietly activated a feature that means you’ve been secretly opted in to a feature that allows the tech giant to access all your private emails.

Why did they do this?

To allow Google to scan their messages and attachments to help train its AI models like Gemini.

Read the full article here.

How do you stop them spying on your data?

In order to stop your data from being used you need to turn off Googles Smart Features in 2 places, as follows:

Online

If you use Gmail through a desktop or laptop, you have to open the ‘See all settings’ tab and choose to turn off the option ‘Turn on smart features in Gmail, Chat, and Meet’ in the section labeled as Smart features.

Gmail users who do not wish to have their private messages scanned by Google's AI learning models will need to turn off two featured immediately

Then you have to open the ‘Manage Workspace smart feature settings’ located right below the Smart features and opt out of the permissions there before saving your choices.

On a mobile device

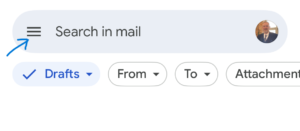
If you access your messages through a smartphone, tap the menu icon, which looks like three lines at the top left of the screen.

Gmail Menu

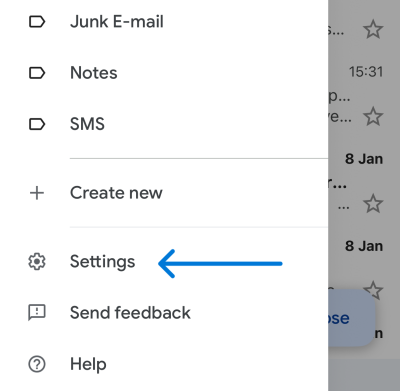
Next, scroll down to the bottom and select ‘Settings,’ 

GMail Settings

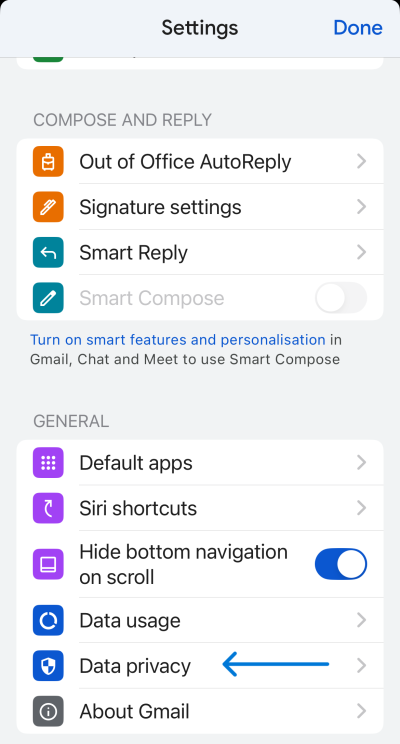
Again scroll all the way to the bottom and then tap ‘Data privacy.’

Gmail Data Privacy

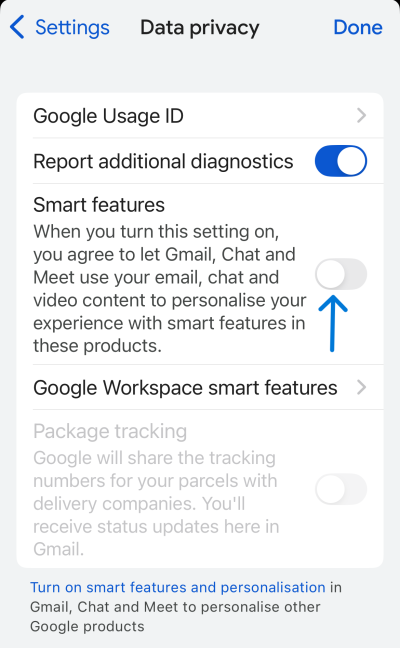
Toggle off ‘Smart features and personalization’

GMail Smart Features

Then tap into ‘Google Workspace smart feature settings’ and turn off the options for Workspace and other Google products.

HOW TO OPEN A SHARED MAILBOX ON A MAC USING OUTLOOK

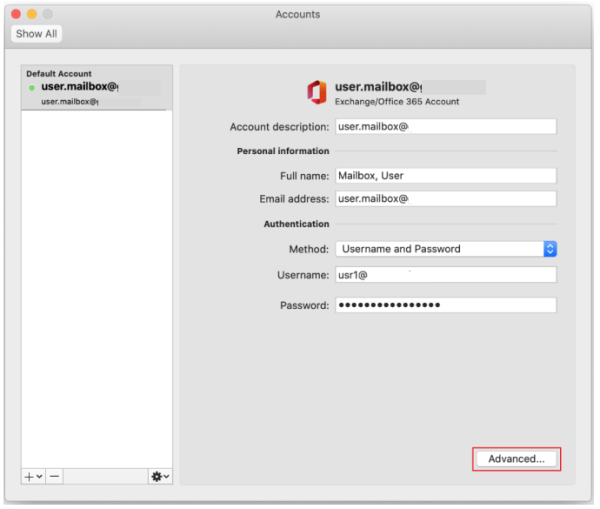
  • From within Outlook for Mac on the Tools menu, click Accounts
  • On the left under accounts click the account that you want to add the shared mailbox to (ie your own account/email address)
user mailbox
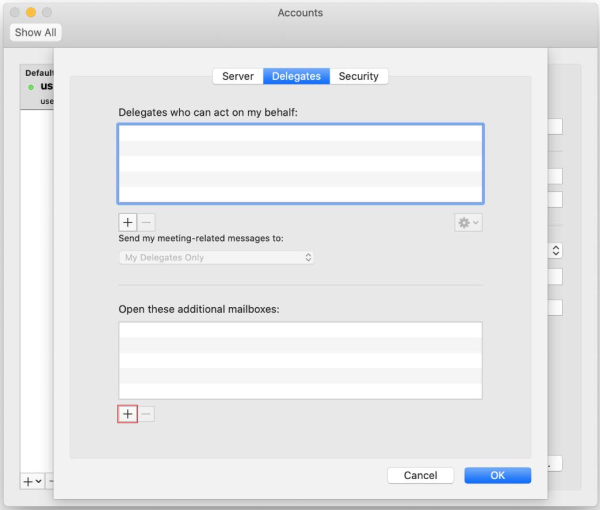
  • Click Advanced bottom right, and then click Delegates tab at the top middle.
delegates tab
  • Under Open these additional mailboxes (the bottom window) click Add  Add.
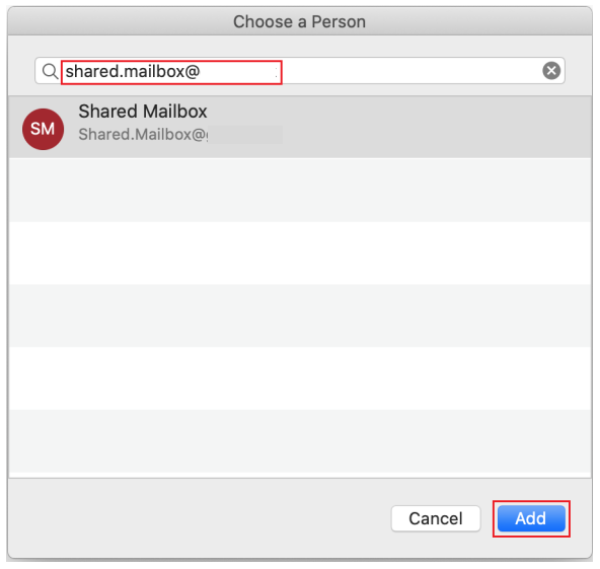
  • Type the name of the person that you want to add as a delegate.
shared mailbox
  • Click the delegate’s name in the search results list, and then click Add.
  • Click OK, close the Accounts window and the shared mailbox should appear on your folder list. Some times you have to close and re-open Outlook.

What is SPF and why do we need it?

SPF is basically your email domain’s guest list — and the mail servers at the door are checking it like nightclub security.

What is SPF?

SPF (Sender Policy Framework) is a record you publish in your DNS that says:

“Here are the servers that are allowed to send email on behalf of my domain. Anyone else? Kick them out.”

It’s literally a list of approved senders.

So if someone tries to send an email pretending to be you — but from some random server — the receiving system checks your SPF record and goes:

“You’re not on the list. you’re not coming in.”

Why we need SPF

1. It stops spoofing (or at least makes it much harder)

Without SPF, scammers can use your domain to blast out phishing emails.
With SPF, their fake sender server gets flagged as unauthorised.

2. It helps your real emails get delivered

Mail providers love SPF.
If they see you’ve got a proper SPF record, they’re more likely to treat your messages as legit and less likely to put them into spam.

3. It’s required for full authentication

SPF + DKIM + DMARC is the holy trinity of “please don’t send my emails to spam.”

DMARC in particular uses SPF results to make decisions, so without SPF your DMARC setup is basically missing a leg.

4. It helps you keep track of who’s sending what

Whenever you add a new email system — e.g. Microsoft 365, a marketing platform, a ticketing system — you add it to your SPF record.
This stops surprises and keeps your domain tidy.


The takeaway


SPF tells the world which machines are allowed to send mail as you.
Without it, your domain is free real estate for spammers, and your delivery rates suffer.

SPF is only one element of protecting your domain, the others are:

You need all three setup and configured correctly for full authentication of your domain.

SPF + DKIM + DMARC are all required for FULL AUTHENTICATION of your email system.

What is DKIM and why do we need it?

DKIM is basically your email’s “tamper-proof seal.”

What DKIM is (in plain English)

When your system sends an email, it stamps it with a special digital signature — kind of like sealing a letter with a unique wax stamp that only you can make.

When the receiving mail server gets the message, it checks your public “stamp” (stored in DNS) to make sure:

  1. The email really came from you, and

  2. Nobody messed with it on the way.

If the stamp doesn’t match, the receiving system goes, “Nope, someone’s been fiddling with this,” and treats it as dodgy.

Why we need DKIM

Because without it…

  • Anyone can fake the “From” address.

  • Messages can be altered in transit and nobody would know.

  • Modern mail systems (Google, Microsoft, etc.) will start looking at your domain like it has a shady past.

  • DMARC, which is the upper-most level protection, relies on DKIM to do half its job.

The simple bottom line

DKIM is the proof that your emails are genuinely yours and untouched.
Without it, your emails look like they could be from literally anyone, and mail providers don’t trust that.


It’s one of the main ingredients that keeps your messages out of spam and keeps impersonators from running wild with your domain.

DKIM is only one element of protecting your domain, the others are:

You need all three setup and configured correctly for full authentication of your domain.

SPF + DKIM + DMARC are all required for FULL AUTHENTICATION of your email system.

What is DMARC and why do we need it?

What is DMARC?

DMARC is basically the bouncer for your company’s email.

When your organisation sends an email, you want the receiver to know it’s really from you and not from some scammer pretending to be you.

DMARC is a rulebook you publish that tells other mail servers:

  1. How to check if an email claiming to be from you is legit
    (It uses two older checks behind the scenes: SPF and DKIM.)

  2. What to do if an email fails those checks

    • Let it through anyway – Not good you don’t want emails not from you arriving in your clients Inbox. Known as p=none

    • Put it in spam – Also not good, yes better than going direct into a clients Inbox but if they check their spam regularly they will still get the email that’s not from you. Known as p=quarantine

    • Or deny/block it – If an email is not genuinely from you then it needs to be denied/blocked so your clients don’t get it. Known as p=reject

  3. Where to send reports about who’s trying to spoof your domain
    So you can see if someone is out there impersonating your brand.

Think of it as:
“Here are my security guards (SPF/DKIM). If someone fails the ID check, here’s how I want you to handle them, and by the way, please send me a daily report.”

So DMARC is a simple but mighty way to stop people sending dodgy emails pretending to be you.

Why do we need it?

Because without DMARC, your email domain is basically a house with the front door wide open and a sign saying, “Please don’t rob me.”

Here’s the easy answer:

1. Stops scammers pretending to be you

Anyone can forge the “From” address on an email. Without DMARC, there’s nothing stopping someone sending fake emails that look like they came from your domain.
DMARC tells receiving servers how to handle fakes, so most of them get blocked or dumped into spam/junk.

If someone sent a fake Invoice to your clients, or even worse they intercepted a genuine Invoice you sent and changed the bank details on that invoice and then sent it on to your client this could result in your client paying someone else. This is not something you want to happen.

2. Protects your brand

If scammers send emails pretending to be you, your company looks unprofessional or — worse — untrustworthy. DMARC helps you avoid that PR nightmare.

3. Improves your email deliverability

Ironically, not having DMARC can make even your real emails look suspicious.
Having DMARC set up correctly makes inbox providers like Microsoft, Google, and everyone else more confident you’re genuine — so your emails land in inboxes instead of spam folders or bouncing back.

4. Gives visibility into what’s happening with your domain

DMARC’s reports show you:

  • who’s sending email from your domain,

  • who’s trying to,

  • and whether your own systems are set up correctly.

You can’t fix what you can’t see.

5. It’s becoming a requirement

Google, Yahoo and Microsoft already expect DMARC from bulk senders. Others will be following soon.

Soon “no DMARC” will be the email equivalent of “no seatbelt”.


In short:
DMARC keeps the bad guys out, keeps your real mail flowing, and stops your domain from becoming a playground for scammers.

DMARC is only one element of protecting your domain, the others are:

You need all three setup and configured correctly for full authentication of your domain.

SPF + DKIM + DMARC are all required for FULL AUTHENTICATION of your email system.

How resolve “the app you are trying to install is not a Microsoft-verified app windows”

Try going to Settings > Apps > Advanced app settings > Choose where to get apps > Select “Anywhere”

Understanding SharePoint storage

Understanding SharePoint storage

Jump to: freeing up space, buying more storage.


SharePoint is a web-based platform that allows you to create, share, and manage content, documents, and information. If you’re responsible for your business data, chances are you manage SharePoint sites. But what happens when SharePoint gets full? Let’s look at the fundamentals of SharePoint storage, and a few ways of managing your SharePoint storage allowance.

How much SharePoint storage do you get with Office 365?

Let’s cut to the chase; that’s why you’re here. To work out how much storage you get with Microsoft 365, use the following equation:

(number of 365 licenses x 10 GB) + 1 TB = total SharePoint storage allowance

Microsoft gives every tenant (i.e. your business) 1 TB of SharePoint storage as standard. On top of that, each 365 user license (such as 365 Business Basic, Standard or Premium) adds an additional 10 GB to the tenant’s SharePoint storage allowance.

Here’s an example: say you have 16 office-based users with 365 Business Standard, 10 remote users with 365 Business Basic, and 10 mailboxes using Exchange Online (plan 2), then your total SharePoint storage allowance would be 1,360 GB, or 1.36 TB.

There is no limit to how much extra storage you can buy for your tenant, but each SharePoint site can be up to 25 TB in size, and no more.

To see how much space your tenant has, and importantly, how much is available, head to your SharePoint Admin Centre. Select ‘Active sites’ in the left-side panel to view all of your SharePoint sites. In the top-right of this page, you will see your SharePoint allowance. Here’s ours in the image below. We have 502.87 GB available!
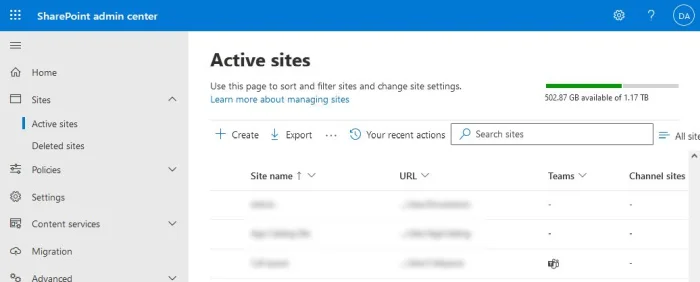
 

SharePoint active sites with storage allowance
The SharePoint active sites page, with storage allowance


Technical note: in SharePoint, like other cloud storage services, 1 TB (terabyte) is defined in the metric 1,000GB (gigabytes), not the binary 1,024 GB. If you don’t know what I’m talking about here, then please don’t worry about it! But if you’ve worked with memory and storage systems at a hardware level, you may be aware of the difference.

Other storage limits

There’re some other limitations to storage in SharePoint that you should be aware of:

  • File sizes in SharePoint are limited to 250 GB per file.
  • Each SharePoint library can hold no more than 30 million files and folders (items).
  • Each tenant can have no more than 2 million SharePoint sites.

Does SharePoint storage include OneDrive?

Individual users’ OneDrive areas do not count towards your SharePoint storage allowance. This is good news! Each user, as an individual, gets 1 TB of OneDrive storage space by default (this was increased from 500GB a few of years ago).

It’s possible for a 365 admin to increase this to 5 TB per user (depending on the user’s 365 license type), again without affecting your SharePoint storage. And here’s a little hint: if a user requires more than 5 TB of OneDrive space (rare, but not beyond the realms of possibility) then Microsoft itself can increase it up to 25 TB per user if you contact 365 Support and pester them.
 

Freeing up space

How do you see what’s taking up all the space in SharePoint? Before you go about buying more, you might want to have a clear-out. Here’s how.

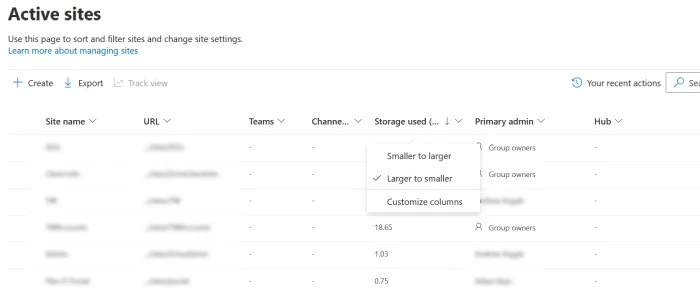
First we need to see which SharePoint sites are hogging your storage. Head to your SharePoint Admin Centre, and then Active Sites. You’ll be presented with a table of your sites; find the column called Storage Used and select the Larger to smaller option. This will sort your sites with the biggest offenders on top.


Active sites
A list of active sites in SharePoint, with the largest at the top


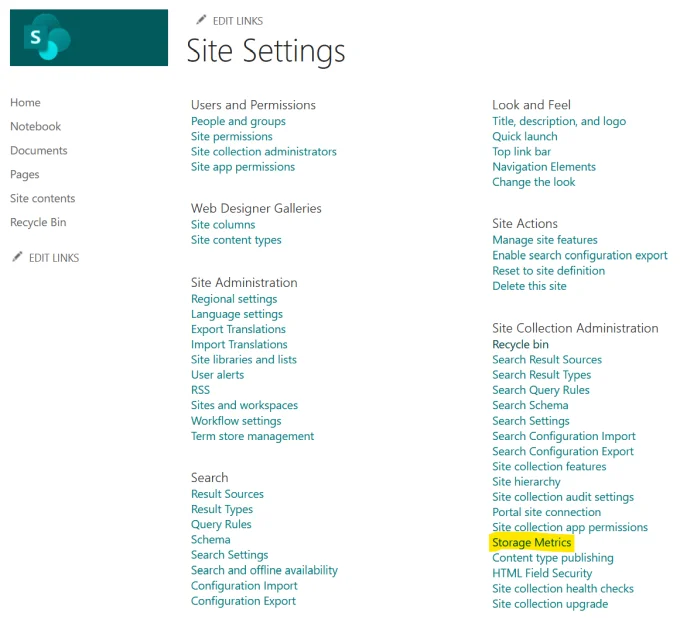
Head into one of the bigger sites by clicking the URL. Once inside, head to the Documents tab on the left, then the Settings cog in the top-right. From here, we select Site Contents, and then Site Settings. It’s a little convoluted, but you’ll now see a big list of settings. Find Storage Metrics, and click it.


Storage Metrics in Site Settings
Storage Metrics buried deep in the Site Settings page


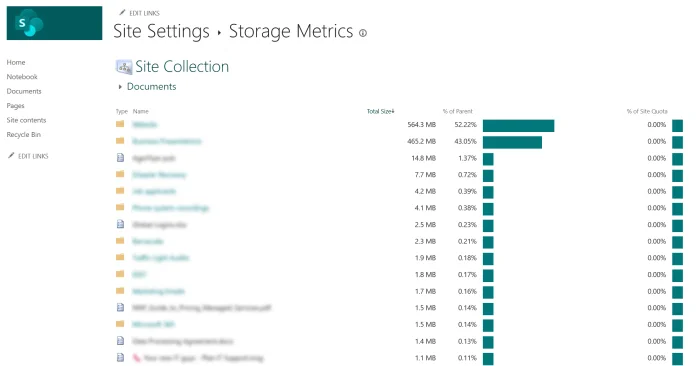
What you’re looking at now is a presentation of the data in your chosen SharePoint site, including the total size of files and folders in there. There is also, helpfully, a percentage bar-graph for each item, relative to the size of the library. This is a really useful, graphical way of seeing which files and folders are eating up all of your storage, and it will make spring-cleaning a doddle. Head into the biggest folders and see if you can delete anything.


Storage metrics page
A list of files and folders, with the storage hogs clearly presented


The SharePoint Recycle Bin

What this doesn’t include, however, is the Recycle Bin. And guess what? The Recycle Bin counts towards your SharePoint storage allowance.

There’s a first-stage and a second-stage Recycle Bin for each SharePoint site, which is great as a safety net for files you may need to scoop out of purgatory, but not so great for storage management. Much as emptying the Recycle Bin on your PC is an easy-win for freeing up disk space, the same is true in SharePoint, so let’s take a look there too.

You’ll see the Recycle Bin in the left-side panel of the site. Click into it, and if there’s anything in there that you think you can safely, permanently delete, then delete it. This will send it to the second-stage Recycle Bin, which can be found by scrolling all the way down to the bottom of the first-stage one. Head into there, and delete it again. Now it’s gone forever (so be warned).

Emptying the Recycle Bin can often take up to 24-hours to reflect in the Storage Used column of your SharePoint sites, so prepare for that.

A clear-out of your bigger SharePoint sites, and taking out the rubbish, can free up an awful lot of space. But what if that’s not enough? Let’s look at increasing your SharePoint storage allowance.


How do you increase your SharePoint storage?

If you reach the limit of your SharePoint storage allowance, all of your SharePoint sites and libraries will go into read-only mode. Disaster! So how do you increase it?

Microsoft allows you to buy extra SharePoint storage space outright, without having to increase the number of Microsoft 365 licenses you own. If you let a managed service provider like Skilled Tech handle your subscriptions, then it’s likely you will have an MCA billing account type, and the below steps will look a little different to you. However, if you manage your tenant yourself (and have a MOSA billing account type, i.e. you signed up to Microsoft 365 directly with a credit card), then here’s how to add extra storage to SharePoint.

Extra SharePoint storage costs £0.17 per GB per month, or £2.04 per GB per year (exc. VAT). The frequency of payment (annual or monthly) will depend on which existing subscription you attach the add-on to, more of which later.

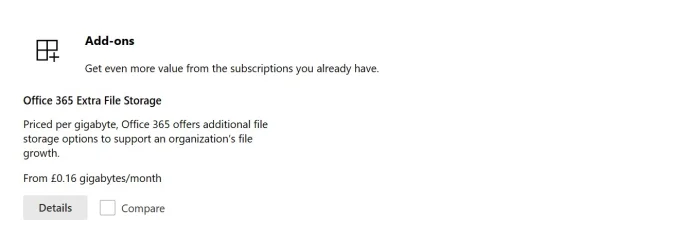
To add this to your tenant, head to the Admin Centre and then Billing > Marketplace. In the Add-Ons section at the bottom of this page, find Office 365 Extra File Storage, and hit the Details button.


Office 365 Extra File Storage
Look for Office 365 Extra File Storage in the Marketplace


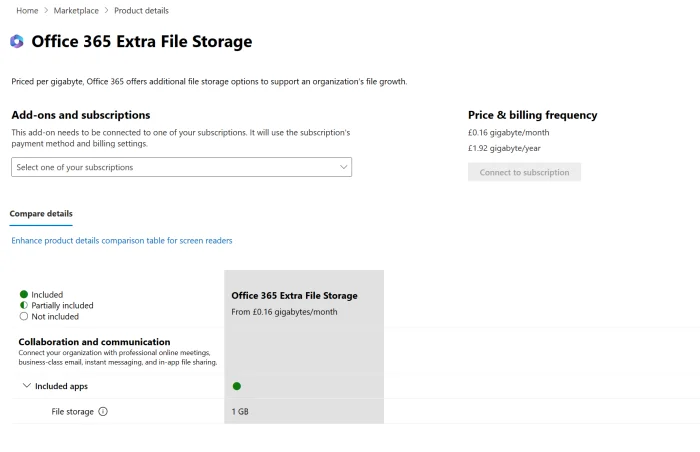
On the next step, you’ll select which subscription you want to align your payments with (you might have 365 Business Basic or Business Standard, for example. You can see these in the Select one of your subscriptions dropdown menu.). If your chosen subscription is paid monthly, you will also pay for SharePoint Storage monthly. If annual, then annual. Once you’re happy, click on Connect to subscription to complete the purchase. You can specify how much extra storage (in gigabytes) you’d like to buy here, or you can leave it set to the default 1 GB and increase / decrease later.


Office 365 Extra File Storage details page
The Office 365 Extra File Storage details page


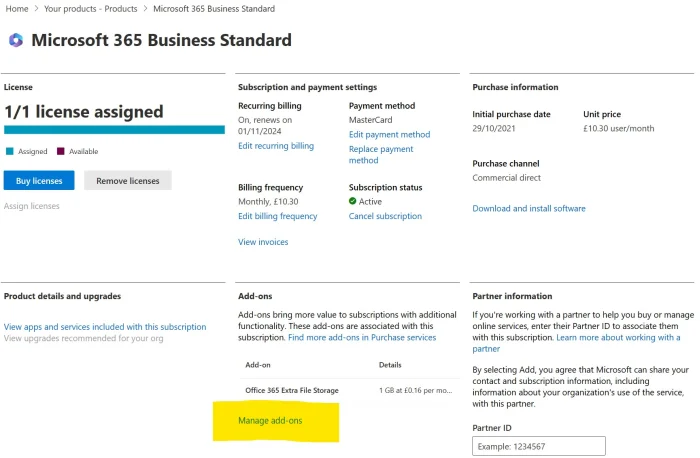
Once you have purchased the add-on, you can increase and decrease the amount of extra file storage on the fly. Back in the Admin Centre, choose Billing and then Your Products. Find the product that you aligned the add-on with. In my case, I have aligned it with my subscription to Microsoft 365 Business Standard.

The details page of your product subscription should look like the image below. Manage add-ons is highlighted in yellow. Click it.


Subscription details page
The Subscription details page, where you’ll find Manage add-ons (highlighted in yellow)


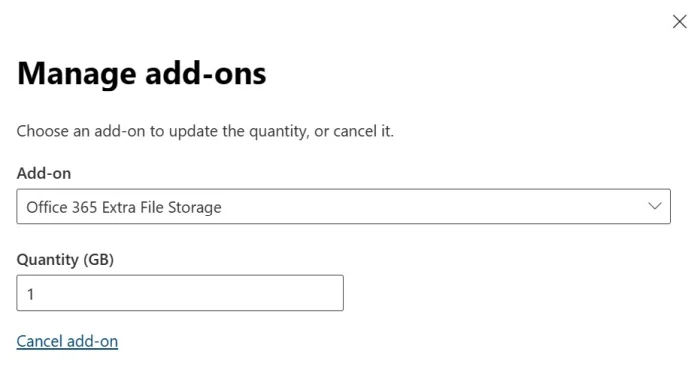
Here you’re presented with a fly-in that allows you to quickly and simply increase or decrease the amount of storage you wish to pay for. Even if you pay monthly or annually, changing this will apply immediately, and Microsoft will bill you pro-rata.


Office 365 Extra File Storage manage add-ons
Increasing or decreasing the amount of storage


You’re now a master at managing your SharePoint storage allowance. A clean-up like that described above should be a regular part of your data management. And getting rid of things you don’t need feels good, right? But if push comes to shove, you know you’re able to increase your allowance. You need never worry about your SharePoint sites going into read-only mode again.